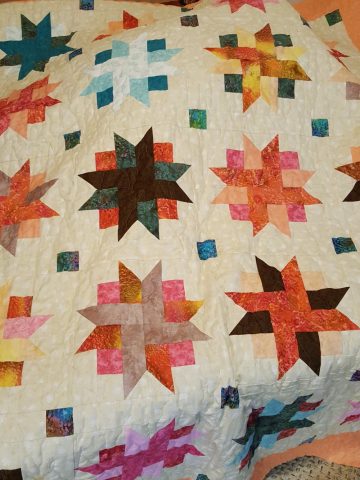
I love to quilt and I love quilts. I see beautiful quilts with fancy free motion quilting all over them and I drool. However, they were quilted on specialized quilting machines and often with the aid of computerized software. I do not have a quilting machine. I own several home sewing machines and the one I use for free motion quilting is my Juki TL-2010Q. The reason I use this machine is because it has a larger throat space.
Note: As an Amazon Associate I earn from qualifying purchases.
My quilts will never have that perfect free motion quilting stitch on them. I can’t get perfection as I am human and my machine is not computerized. However, a finished quilt is much better than a quilt top. So, I quilt my quilts my way.
I quilted three or four quilts with my Juki machine and hadn’t done any free motion quilting on a large quilt until yesterday. The two quilts layered and batted begged to be quilted. Yesterday, I decided to quilt one of them.
Setting Up the Machine for Free Motion Quilting
First, I tested my machine’s free motion stitch to see if it was locking properly. I inserted my Free Motion Quilting Foot into my machine and left the Gutermann Sew-All Polyester Thread I use when I am piecing on the machine. It stitches beautifully when I am sewing seams so I thought I would try this thread first. As I made some basic free motion patterns like a stipple and a loop and circles, it stitched beautifully.
I left the Gutermann thread in the top in but I used a multicolor Sulky 40wt Variegated Rayon Thread in my bobbin because I needed the color to match the back of the quilt. My first stitches showed that my bobbin was not locking tight enough and showing on the top of the quilting piece. I search Google. A website said, “tighten your bobbin case tension“. I bravely tighten my bobbin case tension and turned the screw ¼ turn to tighten. My bobbin stitches still showed. I tightened it again by giving it another ¼ turn and my machine stitched perfectly.
Now that I had the thread down and knew my machine was going to stitch correctly, I focused on the pattern to use. I practiced a clamshell pattern which I thought would make a nice all over free motion quilting pattern. I was doing a pretty good job so I moved on.
Getting Started Free Motion Quilting
I pulled the backed and batted quilt out of its clear bag and loaded it under my machine. Blogs were telling me to start in the middle of the quilt. Starting in the middle of the quilt seemed risky. I feared I would have a bunch in the back and I wanted to start on one end and side. The quilt had a border so I started inside the border and left the border to quilt afterward. Once I loaded my quilt into the machine, I knew immediately that I was not going to do a clamshell stitch on this quilt.
Bravely, I began stitching anyway not even sure of my pattern. As I stitched, it came to me do a sort of flame pattern alternating between a long and mid-way flame up and down in short bands across the quilt. After I quilted the pattern for a few inches, I stood up over the stitches to view them front and back to make sure my machine was stitching properly. Everything looked good and I proceeded to complete the first row.
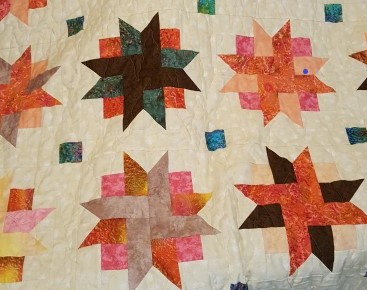
The stitching looked neat and tidy and I was pleased. The light tan top thread matched the background and sashing and blended well with my blocks and cornerstones though they were brightly colored Batiks. The thread only showed boldly on the turquoise-colored fabric. The bright colored variegated thread for the back blended with the multicolor backing and was not showing through on the top at all.
Take Breaks When Free Motion Quilting
After I had completed three progressions across the quilt, I took a break to show my husband and admire my work. My daughter came while I was showing my husband and she played around with some free motion quilting on a sample piece while we visited. All the time she worked on my machine, my machine stitched perfectly. The photo on the right shows her work and colored thread is the wrong side of her stitches.
After she left, I went back to work. Suddenly, my top thread frayed and broke. Hesitantly, I rethreaded my machine and started quilting again. My thread broke again. I was dismayed. The thread breaking can cause me to set the quilting aside and just do the piecing work. I took my quilt off the machine, rethreaded again, and loosened my top thread tension a bit. I started quilting again and everything went smoothly. My machine hummed along and I did not break my thread again.
I finished quilting the entire quilt in one day. The overall effect was very nice and appropriate for the quilt as I was calling this quilt “Fire and Ice” because of the fabrics used. The free-motion flame pattern matched my quilt nicely and my stitches looked pretty good for an amateur.
General Notes on Free Motion Quilting on a Home Sewing Machine
It is not easy to free motion quilt on a home sewing machine. Though my Juki TL-2010Q Sewing Machine has a larger throat space, it is still a rather small area for bed-size quilts and the quilt gets quite scrunched up in that small area. I stop frequently to smooth and adjust the quilt under the work area. It is important to make sure I am only stitching through the three layers and not catching another part of the quilt under my foot.
When it comes to quilting on your home machine, just do it. Practice free motion quilting. Change threads. Adjust your machine tension as needed. Practice on pieces made from the same fabrics in your quilt. Even if you never learn any fancy free-motion stitches, use a basic stipple and just do it. Quilt that quilt! A finished quilt can be used and admired, but no one can enjoy those quilt tops in a storage tub tucked into the closet.
